Inpainting is a versatile tool for modifying specific parts of an image, and it can be applied using two different strategies:
- Replacing a Large Area: This approach is ideal for altering significant portions of an image or for areas unrelated to the main subject in the target zone.
- Replacing a Small Area: Suitable for more focused changes, such as adjusting a single element within the image – like replacing only a face.
In this tutorial, we’ll focus on the second strategy, ‘Replacing a Small Area.’ We’ll guide you through the nuances of this technique, providing insights on how to make precise adjustments. How to use Inpainting in Automatic1111 Part 2 : Large Area – Easy Case and How to use Inpainting in Automatic1111 Part 3 : Large Area – Difficult Case discuss the first strategy, going over how to replace larger or unrelated areas in your images.
Now, let’s get started and explore the art of inpainting.
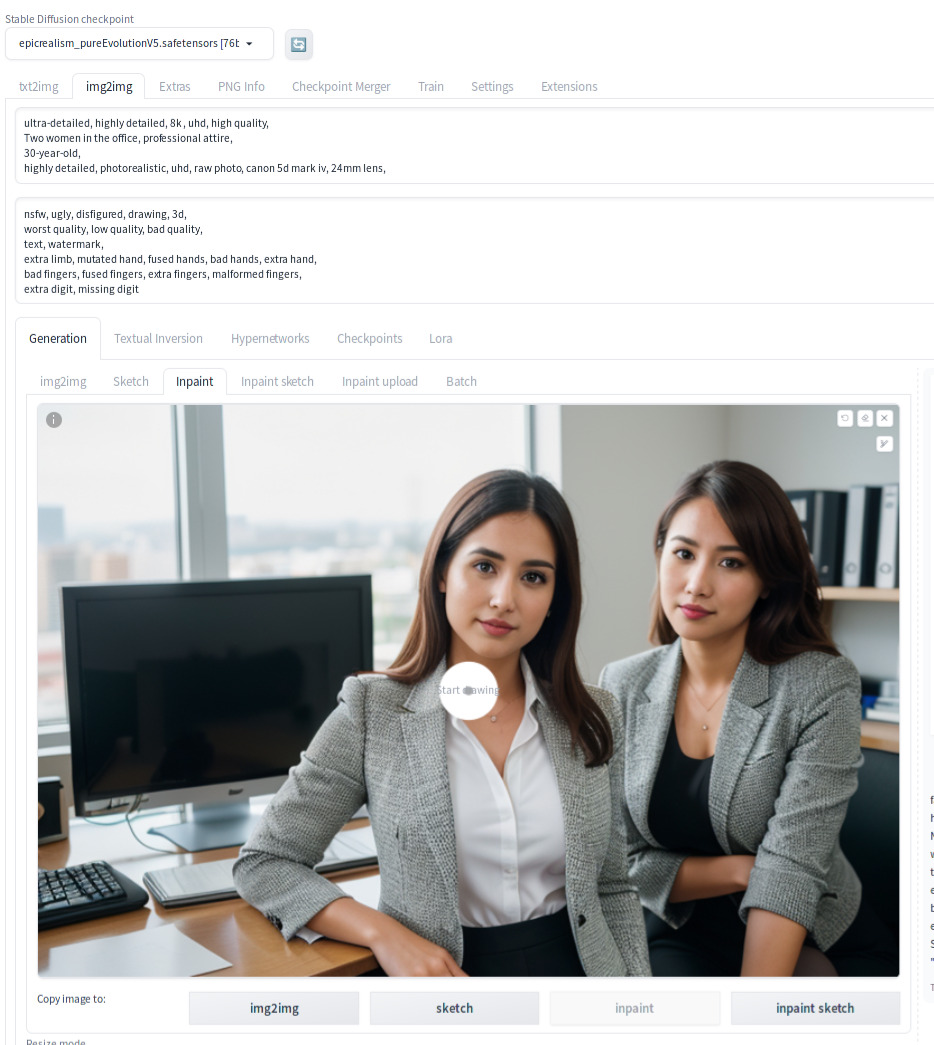
In this tutorial, we’ll focus on repairing the face in an image previously generated using the txt2img tab. If you haven’t yet created an image featuring a face. Once you have generated the image, simply click the ‘Send to Inpainting’ button located below the image to begin the face repair process.

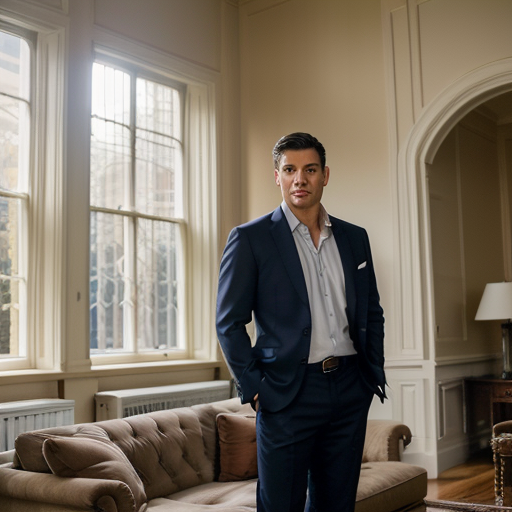
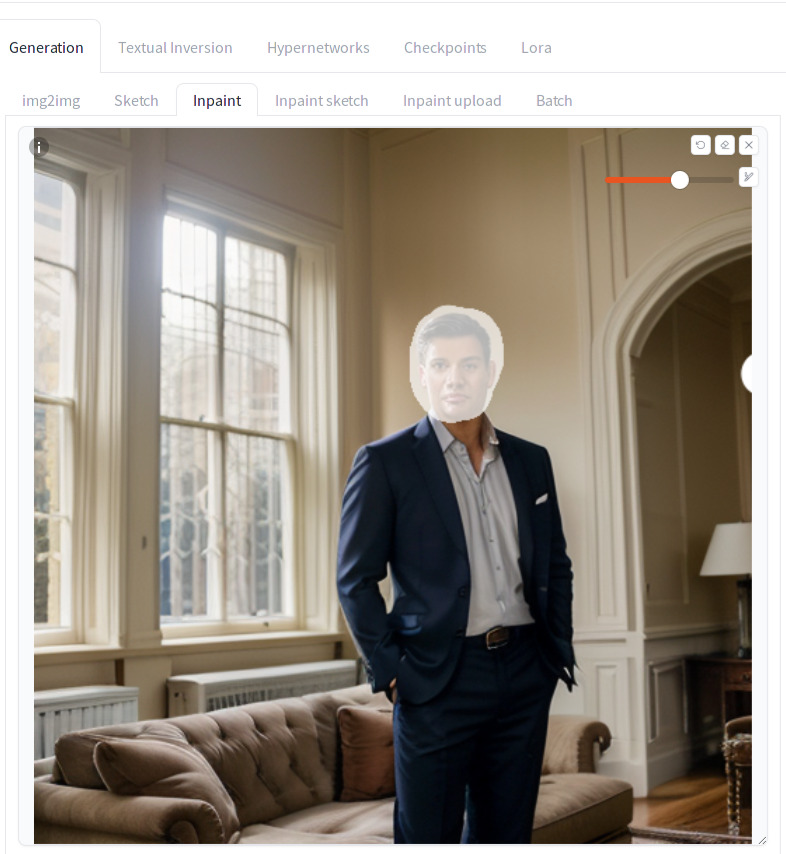
This is the actual image. As you can see, the face is distorted.
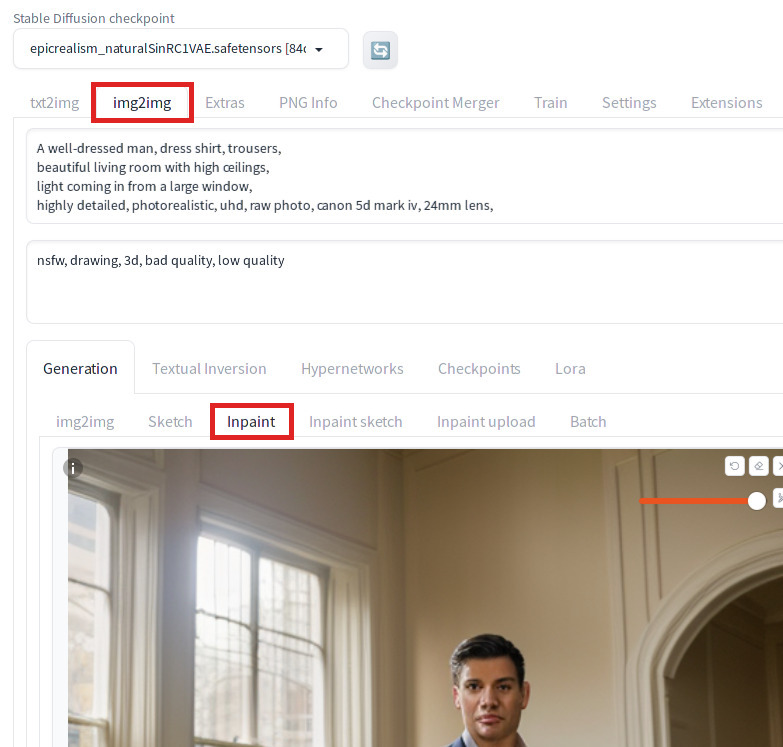
Once you send the image to Inpainting, make sure that you are on the Inpaint sub within the img2img tab.
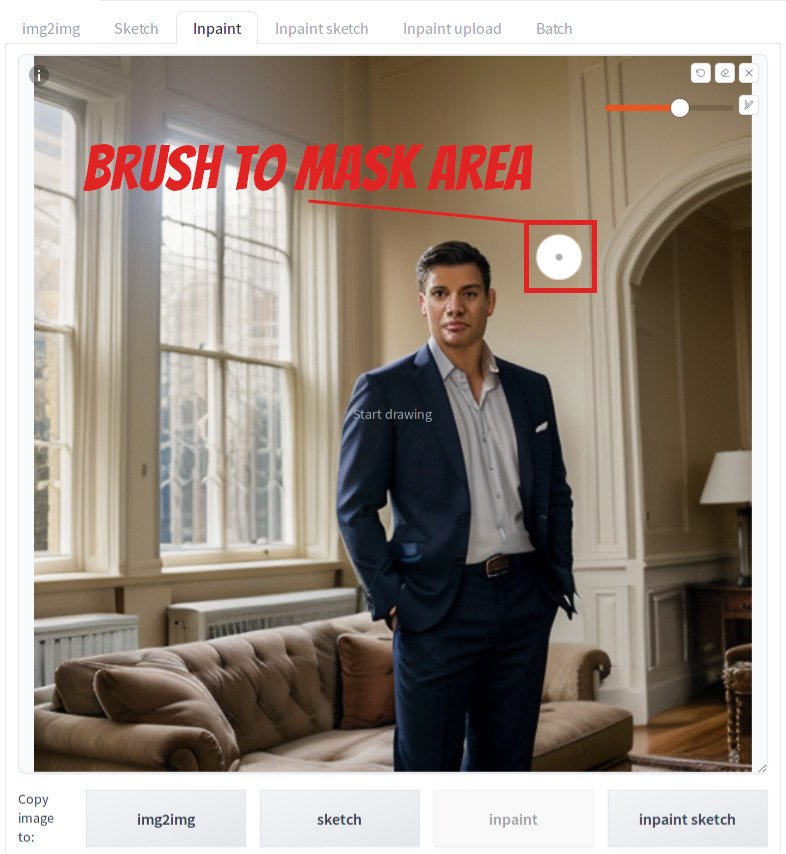
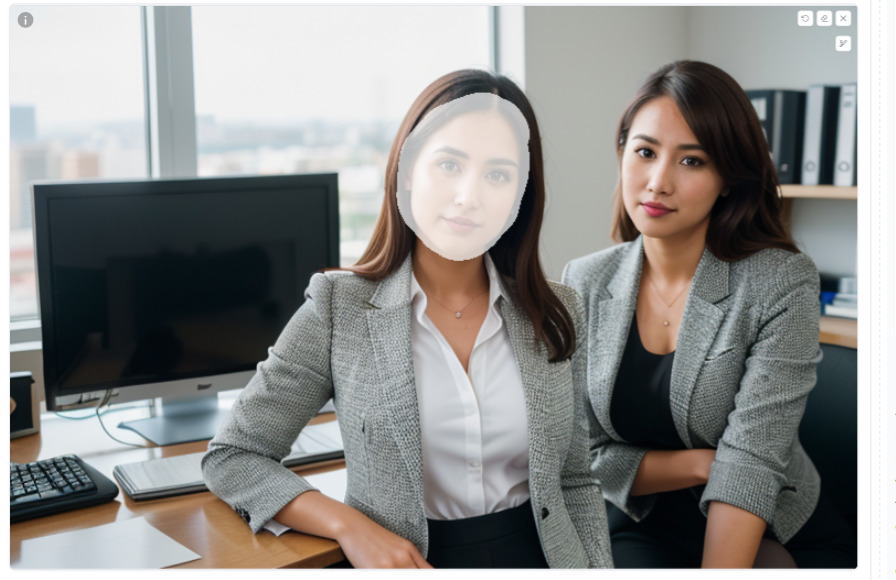
You should see a white filled circle on canvas. That is the brush to mask (or mark) the face. Use your mouse and paint the face.
After masking, your image should look like this.
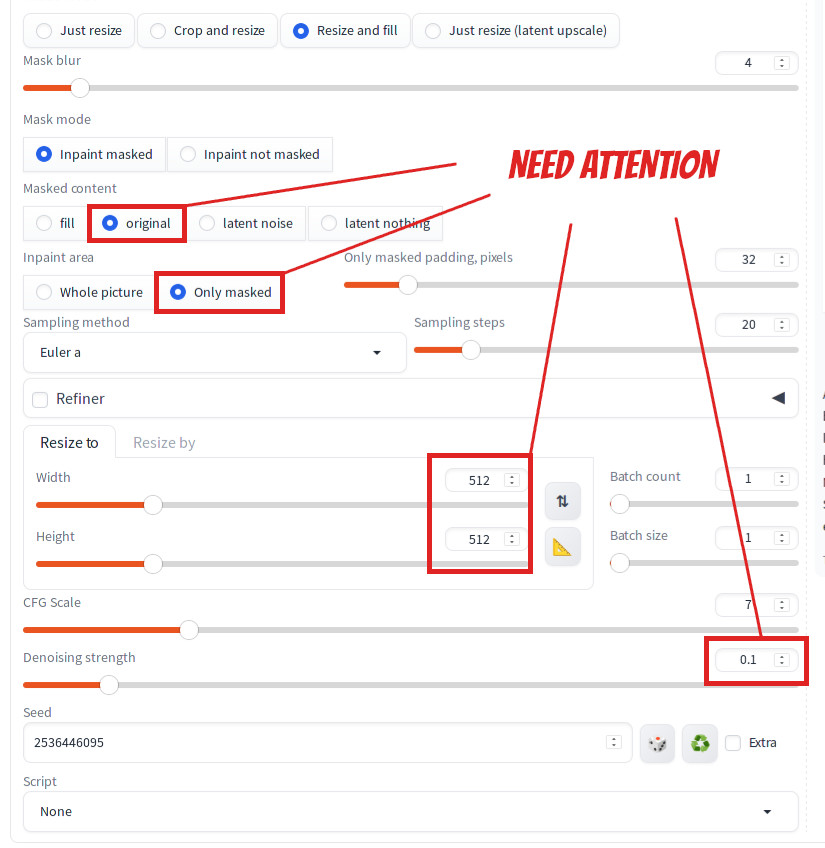
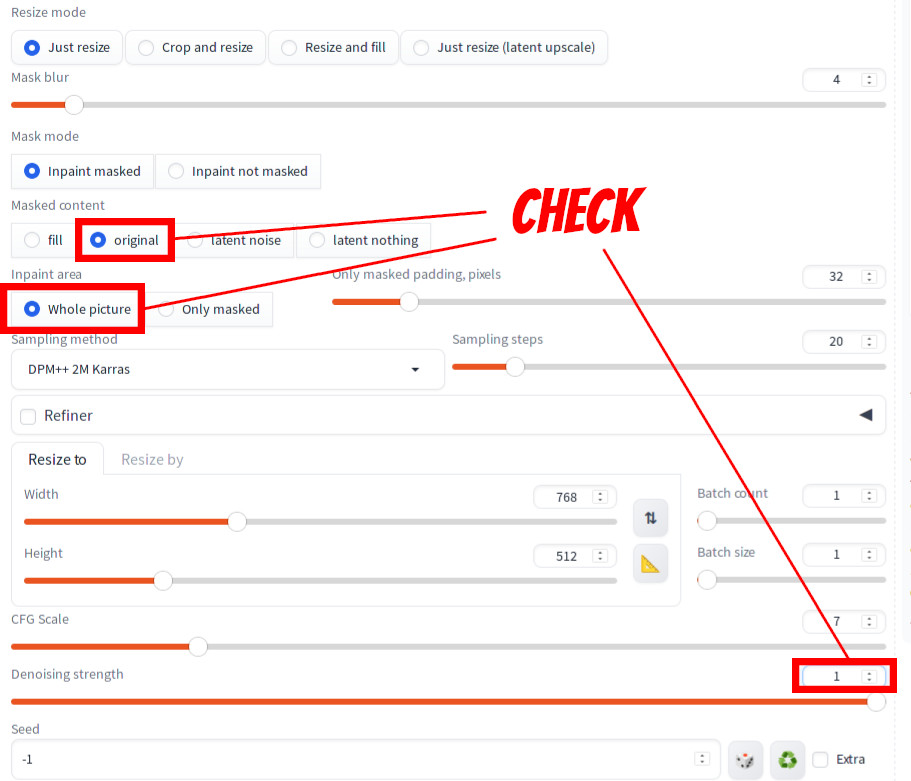
Now, let’s proceed to configure the necessary parameters. Setting these correctly is crucial for the successful execution of the inpainting process. Ensure the following parameters are set or verified as described:
- Masked Content: Choose “Original.”
- Inpaint Area: Select “Only Masked.”
- Width: Set this to 512.
- Height: Set this to 512.
- Denoising Strength: Adjust this to 0.1.
It’s important to note that these parameters are essential for the Inpainting feature to work as intended.
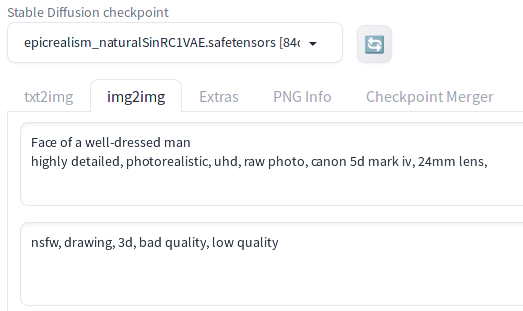
Now update the positive prompt to remove all words that are unrelated to the face and add “Face of” to the prompt as shown below.
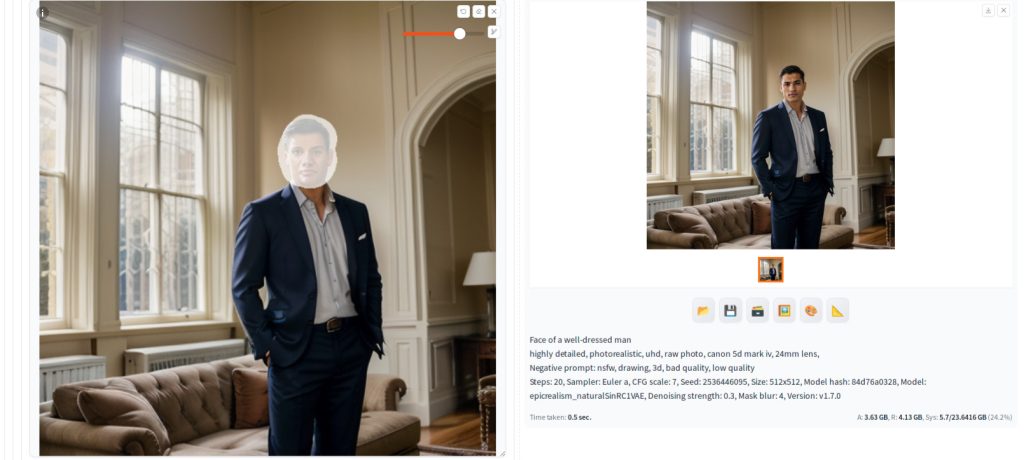
Now press Generate. You should see an image with the face repaired.

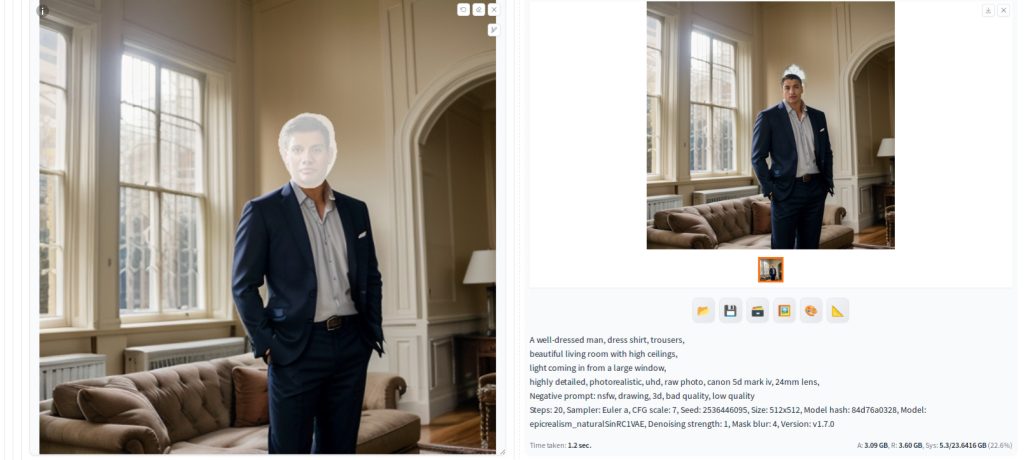
Increment the Denoising strength by 0.1 and repeat generation until you see the desired face. Below is the generation result with Denoising strength set to 0.3.
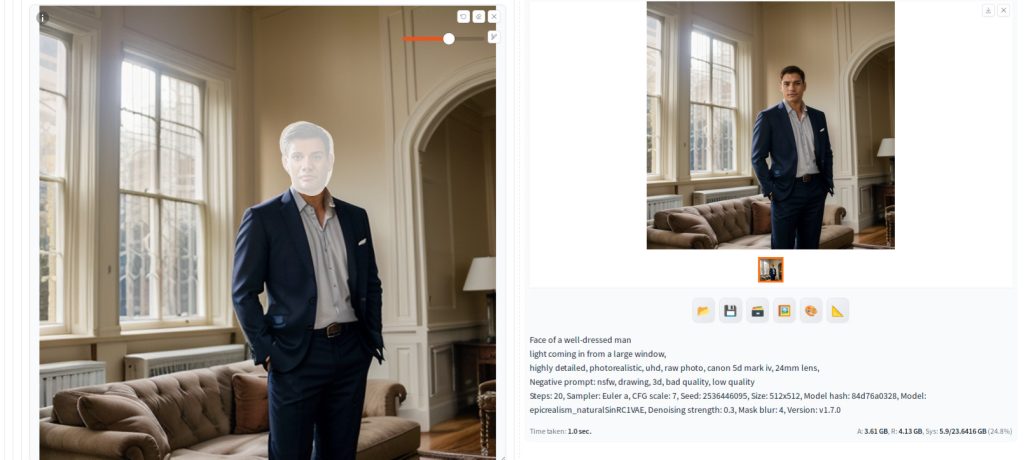
When you enhance the Denoising strength, you’ll observe that the facial features begin to lose alignment with the body. The image below demonstrates this effect with the Denoising strength set at 1. In this particular case, while the head’s proportion remains comparable to the original, it can become disproportionately large or small, or misaligned with the rest of the image. Hence, it’s advisable to start with a minimal Denoising value.

Below is an example of wrong prompt. The original prompt was used instead of the “Face of” prompt. This resulted in the head being too small in the generated image.
Optional further tuning
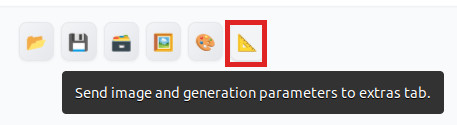
To enhance the quality of the Inpainted area, you can utilize the image upscale feature on the Extras tab. First, send the Inpainted image to this tab by pressing the Send to extras tab button as shown below.
On the Extras tab, upscale the image by 4x. Next, send the upscaled image to back the Inpaint tab.
Once there, mask the face and reapply the exact same parameters, but adjust the size to 512×512, considering the upscaled image’s size is now 2048×2048. This method allows Stable Diffusion to render the facial details with greater precision, as illustrated in the example below.
Note that this method may not work if you try to put an object that is not related to the current image. If this happens, you need to use steps as discussed in the tutorial for replacing the large area.
What if you want to completely change the face? : Use Case for ControlNet Inpainting Model
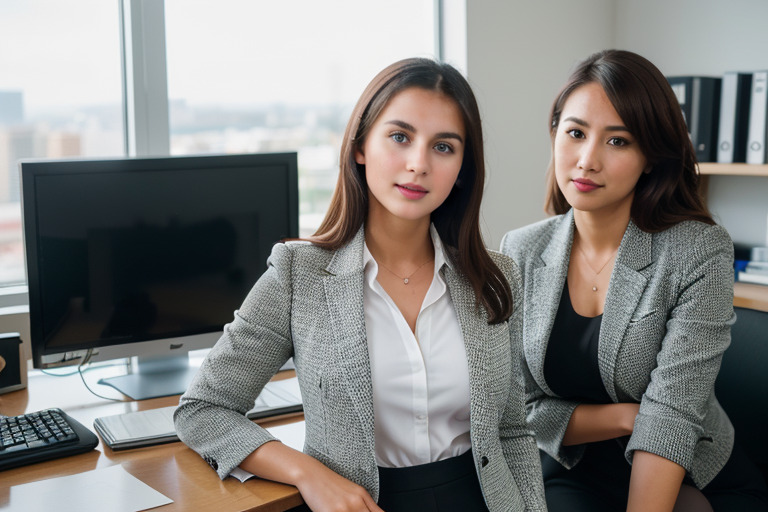
In this section, we delve into a different use case. Consider the image below. Let’s say that this was created at the request of your friend who is contemplating a short story about the friendship between two women. She feels that the woman on the left doesn’t quite align with her envisioned character. Consequently, she asks if you could alter just the face, leaving everything else intact. You could suggest, “I could generate a selection of faces for you to choose from, and then attempt to blend your preferred choice into this image.” However, this approach of photoshopping demands considerable effort for a seamless integration, and downloading face-swapping software isn’t appealing to you either. Moreover, the earlier-discussed face touch-up fall short, as it necessitates a minor level of denoising and thus don’t support drastic facial alterations. For a drastic face change, you could use an Inpainting model, but you don’t have a wide variety. So, what’s the solution? You could use ControlNet Inpainting. This technique enables you to use a standard (non-Inpainting) model for inpainting at a high denoising level, ensuring the face in the masked area remains properly aligned. We will outline the necessary steps here. Please note, it’s imperative to use the steps in this section ethically and legally. You bear full responsibility for any consequences arising from the application of these instructions.

Overview of steps to use ControlNet Inpaint model
Here is an overview of the steps:
- Select a LoRA or a custom model, or devise a prompt to generate an entirely different face.
- Utilize the chosen setting from step 1 to inpaint the face with the ControlNet Inpaint model.
- Refine the face using the touch-up techniques previously discussed.
1. Select a LoRA or a custom model, or devise a prompt to generate an entirely different face.
LoRA provides a straightforward method for creating an entirely distinct face. For this purpose, we will utilize a custom LoRA. This particular LoRA is an experimental, in-house version and is not available to the public. You are free to use any LoRA or custom model, as long as it complies with the relevant licenses and legal requirements. Alternatively, if you’re able to generate a different face using a unique prompt, that’s also a viable approach.
2. Inpaint the face with the ControlNet Inpaint model.
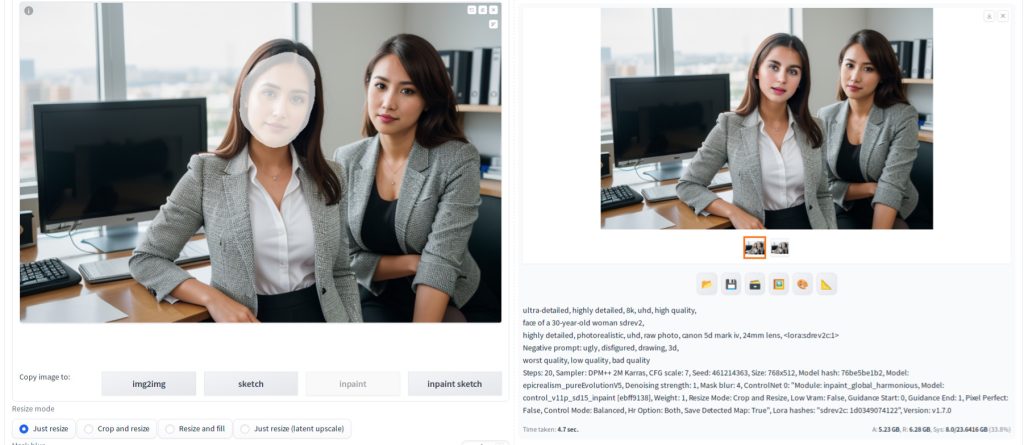
Before you can generate an image with LoRA, it’s necessary to install a specific Control Inpaint model named control_v11p_sd15_inpaint. If you haven’t yet set up ControlNet, please refer to our tutorial titled ‘How to use ControlNet in Automatic1111 Part 2: Installation.’ If you haven’t downloaded this model, place it in the directory as mentioned in the tutorial. Once you’re prepared, load the source image in the Inpaint tab. You should see the following display.
Let’s update the prompt first. Edit your positive prompt to say "face of". Also shown in bold are our LoRA trigger word and the LoRA model name. Replace with yours. Adjust other words based on your needs.
ultra-detailed, highly detailed, 8k, uhd, high quality,
face of a 30-year-old woman sdrev2,
highly detailed, photorealistic, uhd, raw photo, canon 5d mark iv, 24mm lens, <lora:sdrev2c:1>
Here is the negative prompt for this example, but adjust it appropriately.
ugly, disfigured, drawing, 3d,
worst quality, low quality, bad quality
Next, mask the face area.
In the Inpaint setting section, set the following values:
- Masked Content to ‘original’
- Inpaint Area to ‘Whole picture’
- Use the original image resolution for Width and Height.
- Denoise Strength to 1.
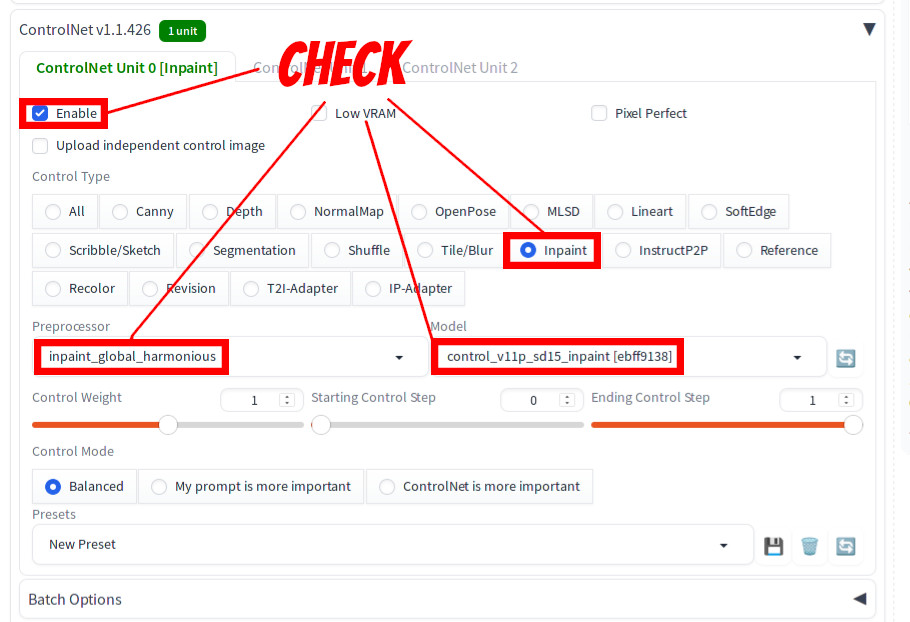
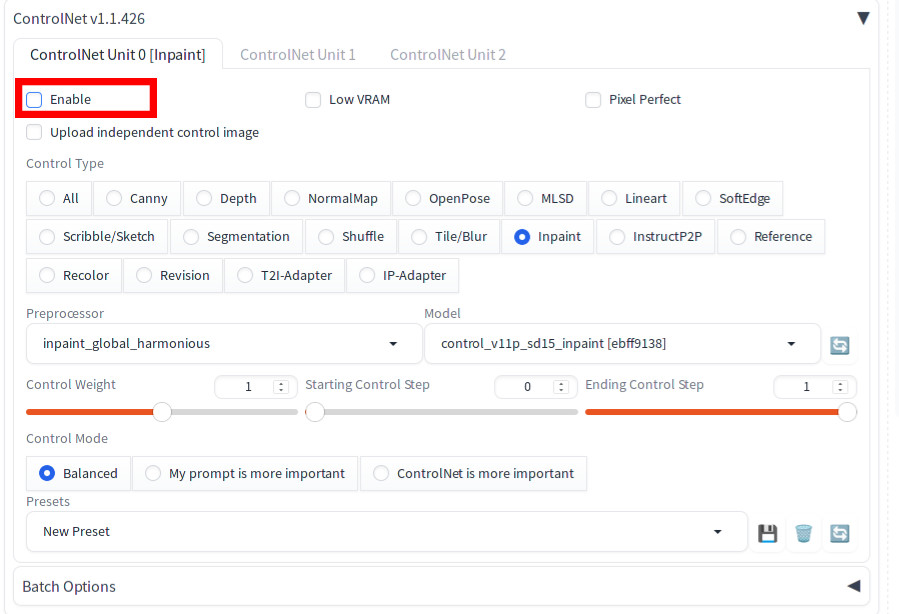
In the ControlNet section, set:
- Check Enable
- Control Type to ‘Inpaint’
- Preprocessor to ‘inpaint_global_harmonious’ (This is very important)
- Model to ‘control_v11p_sd15_inpaint’
Now hit Generate. You should see an image generated that reflects your LoRA. Note that you may need to iterate a few times to adjust LoRA strength or face mask before you see the desired result.
3. Refine the face using the touch-up techniques
Our final step is the same as the touch up step that was discussed earlier except that you need to make sure that ControlNet is turned off. First, let’s send the generated image back to the source canvas on the left by clicking the paint palette button under the generated image. Then in the Inpaint section, set:
- Masked Content to ‘original’
- Inpaint Area to ‘Only masked’
- Both Width and Height to 512.
- Denoise Strength to 0.1 initially and increment for tuning (below screenshot shows 0.2).
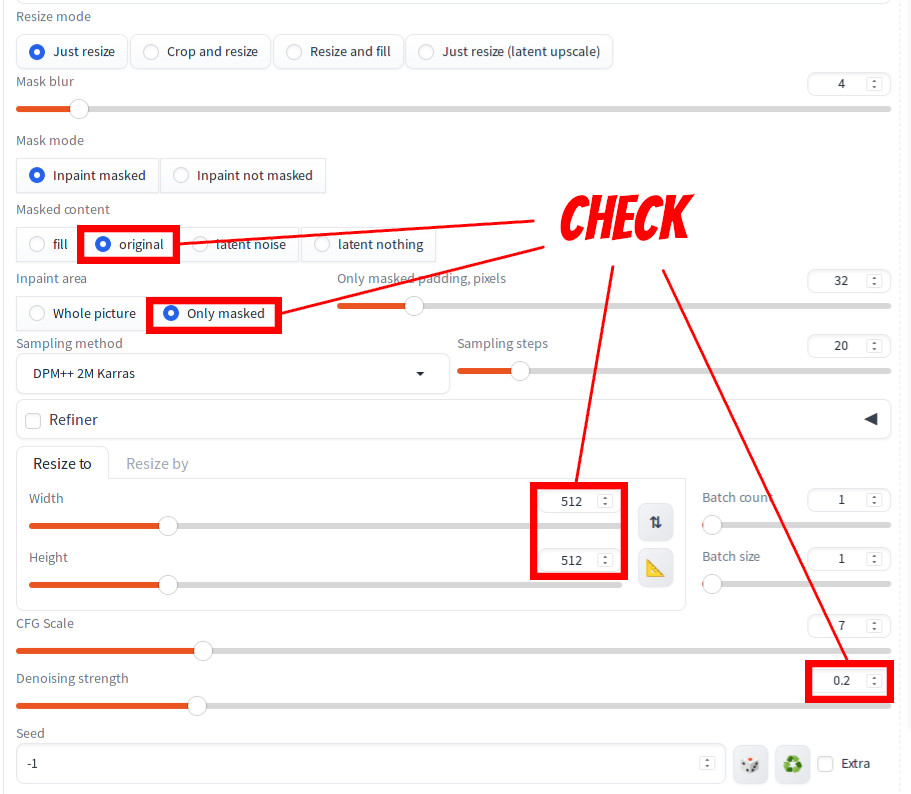
Uncheck Enable. If you forget this, generation may not work well. You may see white haze in the face of the generated image.
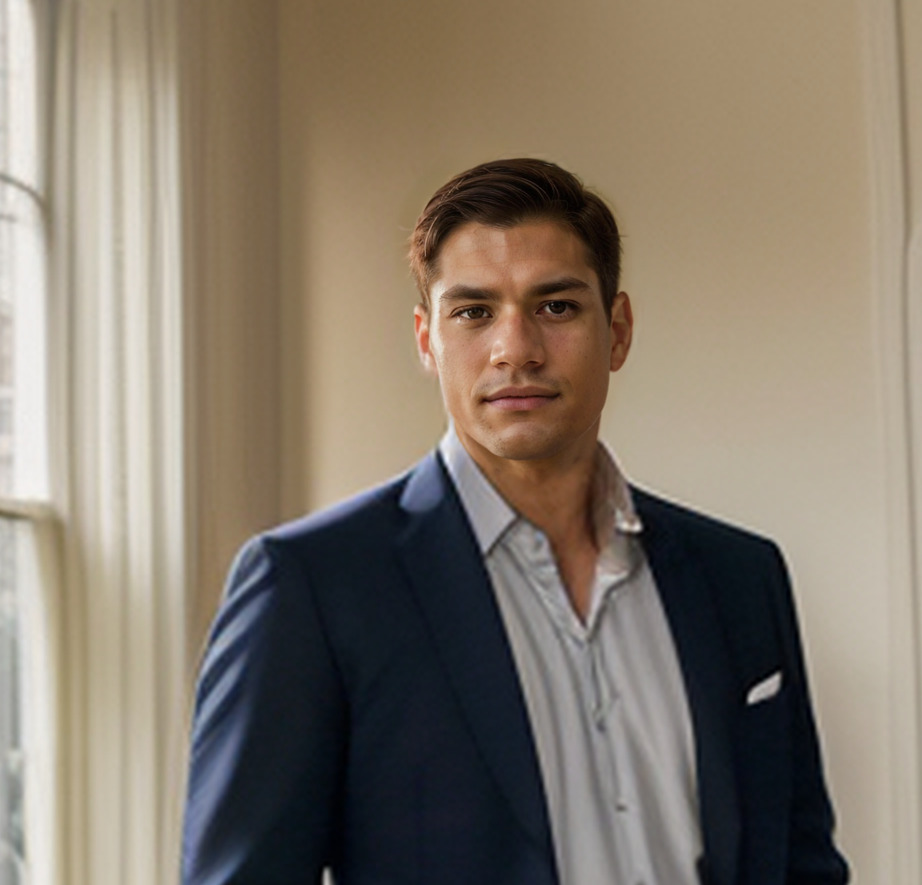
Press Generate again and now you see the image quality is enhanced.
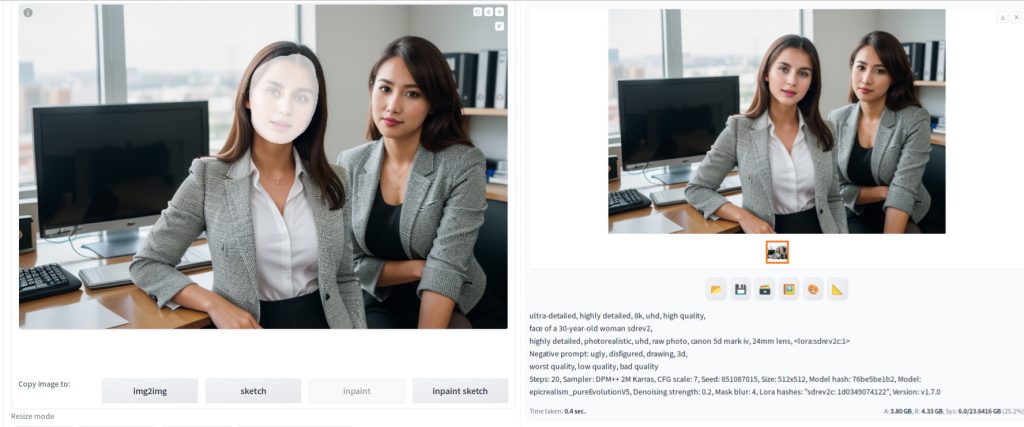
This is the final image.
References
[1] lllyasviel. [New Feature] Guidelines for using inpaint in A1111 #968. Retrieved from https://github.com/Mikubill/sd-webui-controlnet/issues/968