Overview
The Compressed Image Generator is a crucial module within Stable Diffusion. It begins by taking text embeddings as input and generates a compressed image representation. This compressed image is subsequently transformed into a standard image format by the ‘Compressed-Image to Image Converter’. A pivotal aspect of Stable Diffusion, this module is often referred to as ‘latent diffusion‘ [1]. The latent diffusion process plays an essential role in refining and enhancing the image quality, effectively reducing noise (denoising) and improving clarity to produce the final output.
Components
Inputs
This module operates with two primary inputs:
- The text embedding of the prompt.
- The text embedding of the negative prompt, or alternatively, a blank string.
The first input, known as the text embedding of the prompt or the positive prompt, plays a pivotal role in guiding the image generation process. It encapsulates the essence of the user’s request, transforming textual descriptions into a format that the module can interpret and act upon. The second input, involving the text embedding of the negative prompt or a blank string, serves as a counterbalance or a neutral element, assisting in refining and directing the output more accurately.
This module takes two inputs:
- Text embedding of the prompt
- Text embedding of the negative prompt or a blank string
The transformation of text into embeddings is carried out by the Text Embedding Generator, also known as the text encoder. For more detailed information on this process, please see the text embedding generator section.
Output
The output of this module is a compressed image, represented by 16,384 numbers, tailored for the final output of a 512 x 512 pixel RGB image. This compressed form is structured in a 64 x 64 x 4 format. You might wonder why the module doesn’t directly generate the final image. This approach is, in fact, one of the key features of Stable Diffusion. Generating large-sized images demands significant computational resources. To address this, the developers of Stable Diffusion devised a two-phase image generation pipeline:
- Generation of a compressed image.
- Conversion of the compressed image into the final, full-sized image.
This modular approach enables the independent training of each phase. Particularly, the generation of the compressed image is a complex task. By focusing solely on this aspect, developers can more effectively optimize core image generation processes. The module tasked with transforming the compressed image into the final, full-size image operates using the decoder in a Variational Autoencoder (VAE). This similarity is explored in greater detail on another page.
During the initial phase of image generation, the target is a compressed image, and the computations are based on this target. The domain where this transformation occurs is known as the ‘latent space.’ Hence, this process is referred to as ‘latent diffusion,’ reflecting the crucial role of latent space in the image generation pipeline.
How does compressed image generation (latent diffusion) work?
As an end-user, you might not be overly concerned with the intricacies of how an image is generated from the text you input. However, in the case of Stable Diffusion, a basic understanding of its internal mechanisms is beneficial. This knowledge helps you grasp the significance of various parameters you encounter in the image generation tool.
Consider the image shown below: It appears quite noisy.
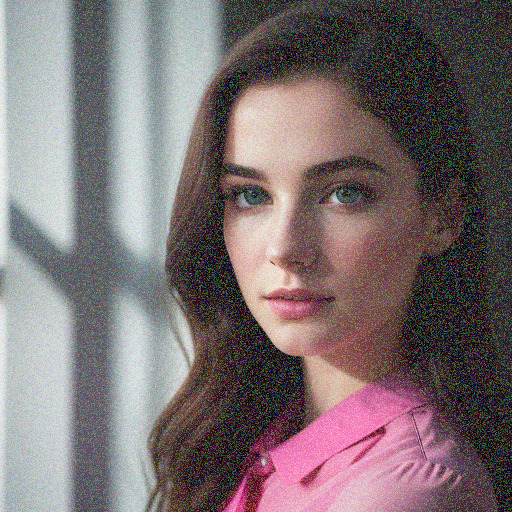
Is it possible to remove the noise? One might think of using Photoshop or a similar tool to clean up the image.
Now, take a look at this second image: This one presents a greater challenge. For instance, the eye color of the person in the image is indistinct.
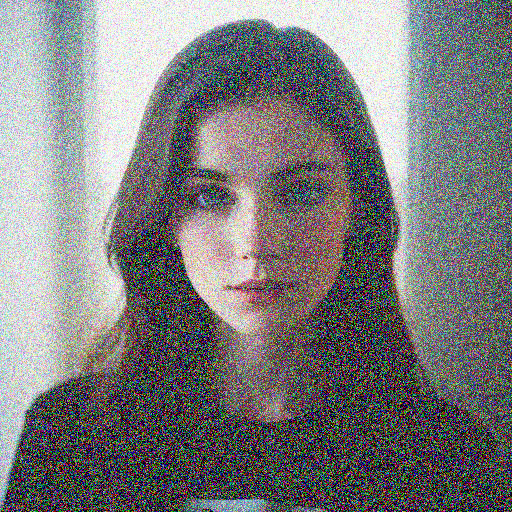
Imagine if you were given a hint, such as knowing the person has blue eyes. With this additional information, you could begin to restore the image more accurately.
Let’s explore an even more extreme case: Can you discern anything from an image that’s almost pure noise?
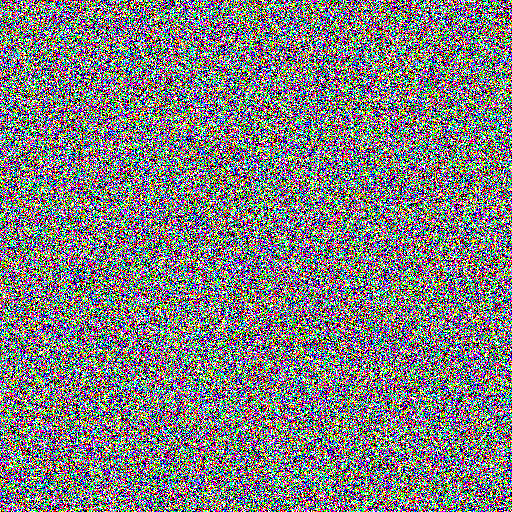
Without any context, this task seems impossible. However, if someone hints that the image is of a person, you might start to make out some details. The process of restoring the image involves numerous small steps and is influenced by any clues you’re given about the content hidden in the noise.
In going through these steps, you have essentially taken on the role of latent diffusion, a crucial process in Stable Diffusion.
To summarize the process:
- You start with an image that’s purely noise.
- You receive a hint about the actual content hidden among the noise.
- Gradually, you remove bits of noise, repeating this process multiple times until a clear image emerges.
Let’s apply this analogy to Stable Diffusion. The process works as follows:
- Stable Diffusion starts by generating random noise.
- It then uses the text embedding you provided as a clue to remove a little bit of noise.
- The system repeats steps to gradually remove noise and clarify the image.
A single noise removal iteration consists of two distinct parts:
- Noise Prediction Model: This utilizes a neural network model known as UNet. It predicts the noise present in the current noisy image.
- Noise Removal Logic: This is the computational code, mathematically designed to remove a bit of noise from the still noisy image using the output provided by the noise prediction model. This part is referred to as a sampler. There are various samplers available, and their choice significantly impacts image generation in Stable Diffusion. The sampler’s functionality often involves complex mathematical concepts, including ordinary differential equation (ODE) solvers and statistical concepts, which are beyond the scope of this overview. However, I will provide links to key academic papers for those interested in delving deeper. Additionally, an easier-to-understand guide is planned for future release.
The important takeaway is that a sampler is essential for noise removal in the image generation process. The output from the noise prediction model alone is insufficient for cleaning the image and both are needed for a single iteration of the noise removal process. Thankfully, you can experiment with different samplers without needing an in-depth understanding of their internal mechanisms.
Another key parameter in Stable Diffusion is classifier-free guidance scale. This parameter configures the extent to which Stable Diffusion considers the provided clues (text embeddings).
- A lower classifier-free guidance scale value means latent diffusion pays less attention to the clue.
- Conversely, a higher classifier-free guidance scale value indicates more attention to the clue.
Recall that two sets of random noises are generated and processed by the noise prediction model simultaneously. After the noise prediction model outputs its results, these are combined before a sampler further processes it to produce a cleaner image, incrementally removing noise. CFG plays a critical role in determining the ratio of this combination. Specifically, the formula used is as follows:
adjusted_model_output = model_output_without_clue + classifier_free_guidance_scale × (model_output_with_clue − model_output_without_clue
In the source code of Stable Diffusion, classifier-free guidance scale is referenced as the ‘unconditional guidance scale’. You’ll find the following line in the source code, corresponding to the above equation:
e_t = e_t_uncond + unconditional_guidance_scale * (e_t - e_t_uncond)
This line effectively adjusts the model output based on the classifier-free guidance scale value, balancing between the guidance provided by the text embeddings and the inherent characteristics of the generated image.
Negative prompt
By default, the latent diffusion model in Stable Diffusion processes a blank string as a clue to remove noise from the second noisy image. However, you also have the option to specify a text prompt as a ‘negative prompt’ to guide the model away from generating certain elements in the image. It’s important to note that this technique is not foolproof. There’s still a possibility that the final image may contain elements you intended to exclude with the negative prompt. While this approach can influence the image generation process, its effectiveness can vary, and complete exclusion of specific elements is not guaranteed.
Size of an image
Suppose you wish to generate an image with dimensions of 768 pixels in height and 512 pixels in width, a size commonly used for portraits. How does Stable Diffusion handle this? The process is quite straightforward: Stable Diffusion scales down the final image size by a factor of 8 to determine the size of the compressed (or latent) image. This means that the initial noise dimension for a 768×512 image would be set to 96x64x4, and the process of cleaning up the noise begins from there.
However, it’s important to note that deviating significantly from the standard dimensions of 512x512x3 can lead to suboptimal results. This is because the noise prediction model is primarily trained on images of these standard dimensions. If you choose dimensions other than 512×512 and notice issues with the image quality, it may be advisable to revert to the standard 512×512 size and apply scaling techniques separately to achieve your desired dimensions.
Linking Concepts to Automatic1111 UI Components
Now, let’s connect what you’ve learned to the user interface of Automatic1111, a popular software tool for creating images with Stable Diffusion. Automatic1111 includes the Stable Diffusion code along with additional features. Even if you’re new to this software, let’s see if you can match its key UI components to their functions:
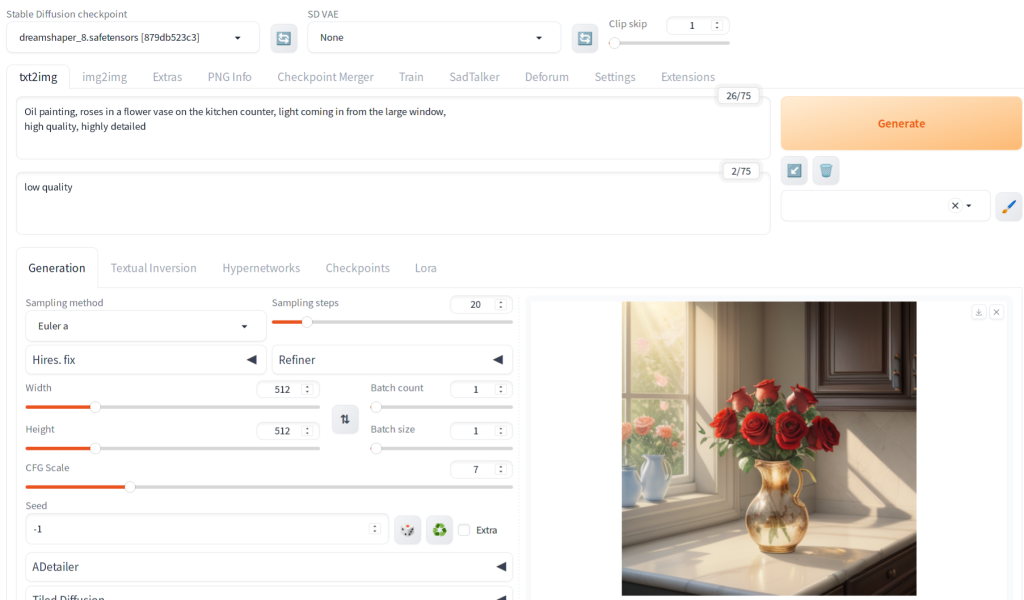
- Prompt (or Positive Prompt): This is shown immediately below “txt2img” tab. This is where you input the main text to guide the image generation.
- Negative Prompt: This is shown below the positive prompt text area. Here, you specify what elements you want the model to avoid including in the image.
- Sampling Method: This option allows you to choose the sampler used for the denoising process.
- Sampling Steps: Determines the number of steps in the noise reduction process.
- Width and Height: These settings control the dimensions of the generated image.
- CFG Scale: This is classifier-free guidance scale, adjusts the influence of your text prompts on the final image.
If there are other UI components you’re not familiar with yet, don’t worry. They will be covered in detail on another page.
Further reading
The References section below lists several influential papers pertinent to Stable Diffusion. For those looking to refresh their understanding of Ordinary Differential Equations (ODE) and do not have access to a textbook, ‘Schaum’s Differential Equations, Fourth Edition’ offers clear and concise explanations of key methods such as Euler’s method, the Runge-Kutta method, and the Adams-Bashforth-Moulton method.
References
[1] Robin Rombach et al. High-Resolution Image Synthesis with Latent Diffusion Models. arXiv:2112.10752v2, 2022.
[2] Jascha Sohl-Dickstein et al. Deep Unsupervised Learning using Nonequilibrium Thermodynamics. arXiv:1503.03585v8, 2015.
[3] Jonathan Ho et al. Denoising Diffusion Probabilistic Models. arXiv:2006.11239v2, 2020.
[4] Yang Song et al. Score-Based Generative Modeling through Stochastic Differential Equations. arXiv:2011.13456v2, 2021.
[5] Jiaming Song et al. Denoising Diffusion Implicit Models. arXiv:2010.02502v4, 2022.
[6] Tero Karras et al. Elucidating the Design Space of Diffusion-Based Generative Models. arXiv:2206.00364v2, 2022.