Problem to solve – Overview of Hires. fix
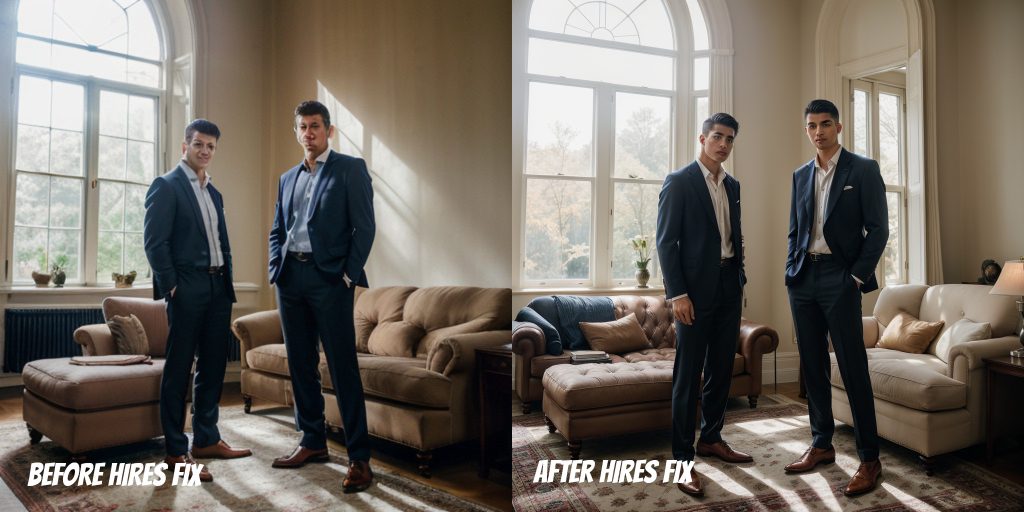
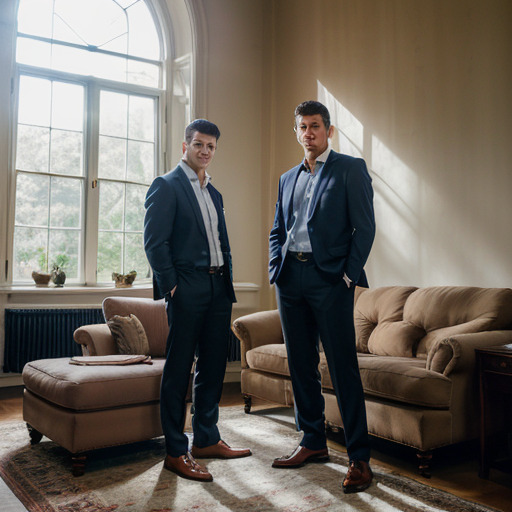
To understand the need for a high-resolution fix, often referred to as ‘Hires. fix,’ see the photo below where the faces resemble characters from a horror movie, while the rest of the image appears normal. At the default 512×512 resolution, Stable Diffusion can struggle with rendering detailed features like faces and eyes. The Hires fix combats this by upscaling the image for enhanced detail and then processing it through a latent diffusion model again. Although some touch-up of the image might be necessary, this method effectively addresses major distortions, making it a valuable asset in art creation. Additionally, Hires fix can be used to enhance the visual quality of your images, even when extensive geometric changes are neither needed nor desired. We will delve into both scenarios. Let’s explore these techniques further.
Overview of Hires. fix
The diagram below provides an overview of the Hires fix process. Hires fix involves an additional diffusion pass to produce the final image. There are two different sets of steps depending on the chosen upscaling method. For latent upscaling, the latent image is upscaled in latent space using the torch.nn.functional.interpolate method. For other upscalers like ESRGAN, the latent image is first decoded by a VAE, upscaled using the selected upscaler, and then re-encoded back into latent space by the VAE. Once upscaled latent image is generated via either path, it is processed through the image-to-image module for the second diffusion pass.
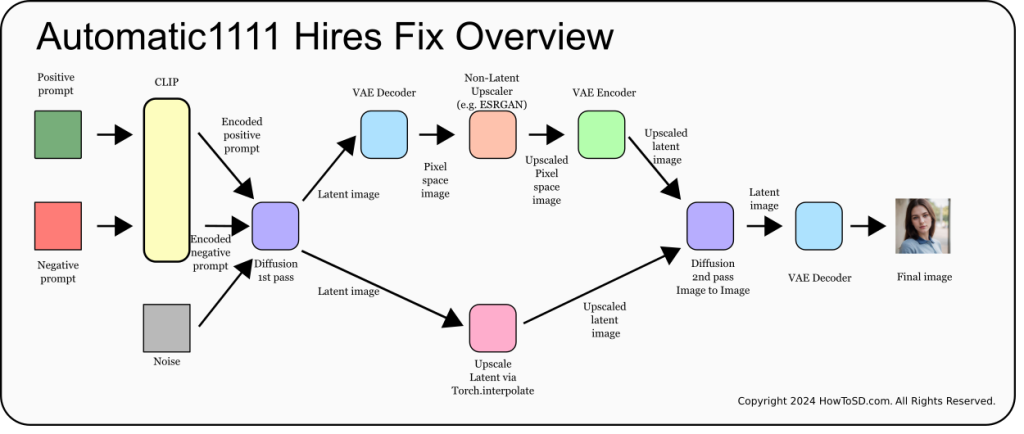
Note to developers: In the code, this process is defined in sample() and sample_hr_pass() methods in modules/processing.py. Check out if you are interested in learning more.
Using Hires. fix
Using Hires fix is a straightforward process. First, we’ll explore a scenario where extensive geometric changes, such as face reconstruction, are necessary. Later, we will discuss a different scenario where geometric changes are neither required nor desired.
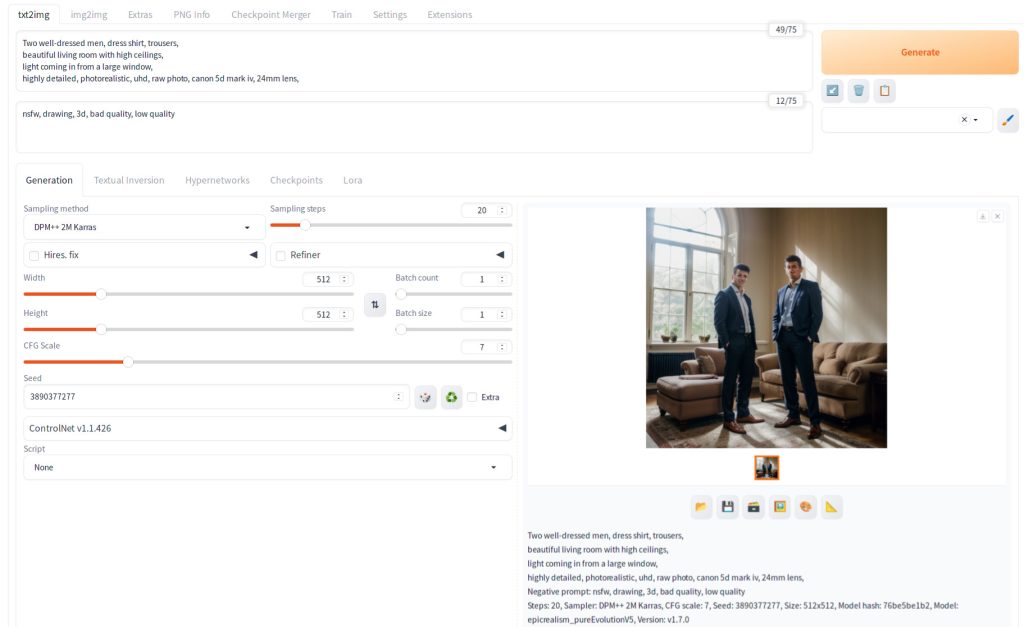
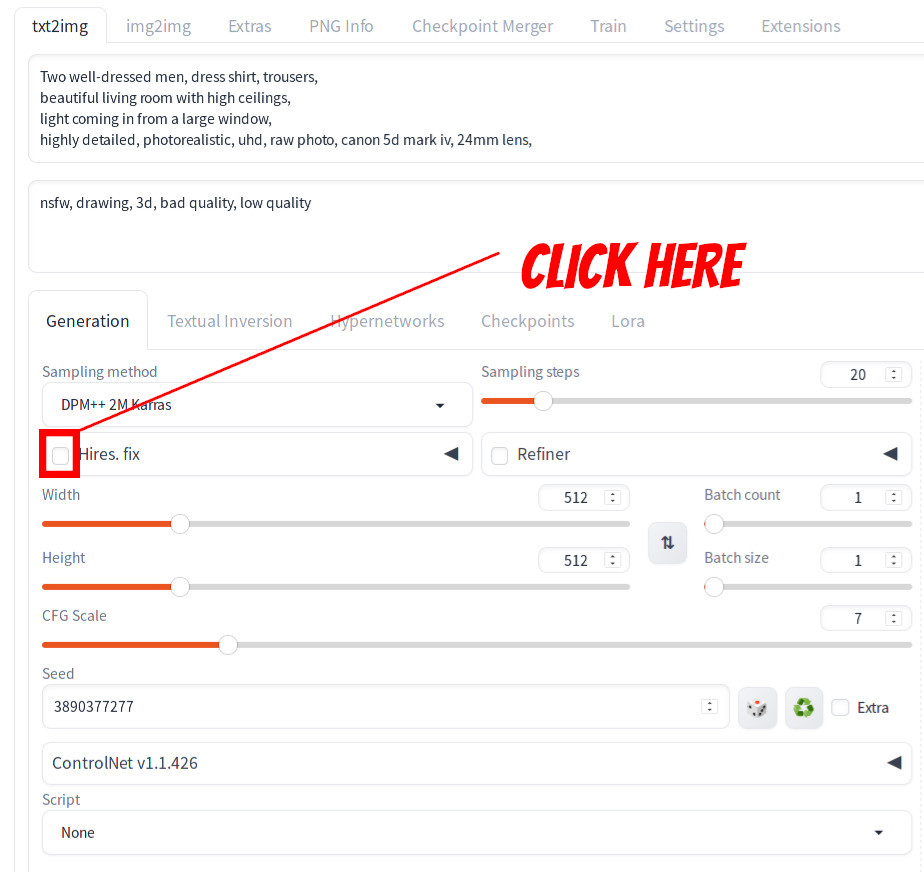
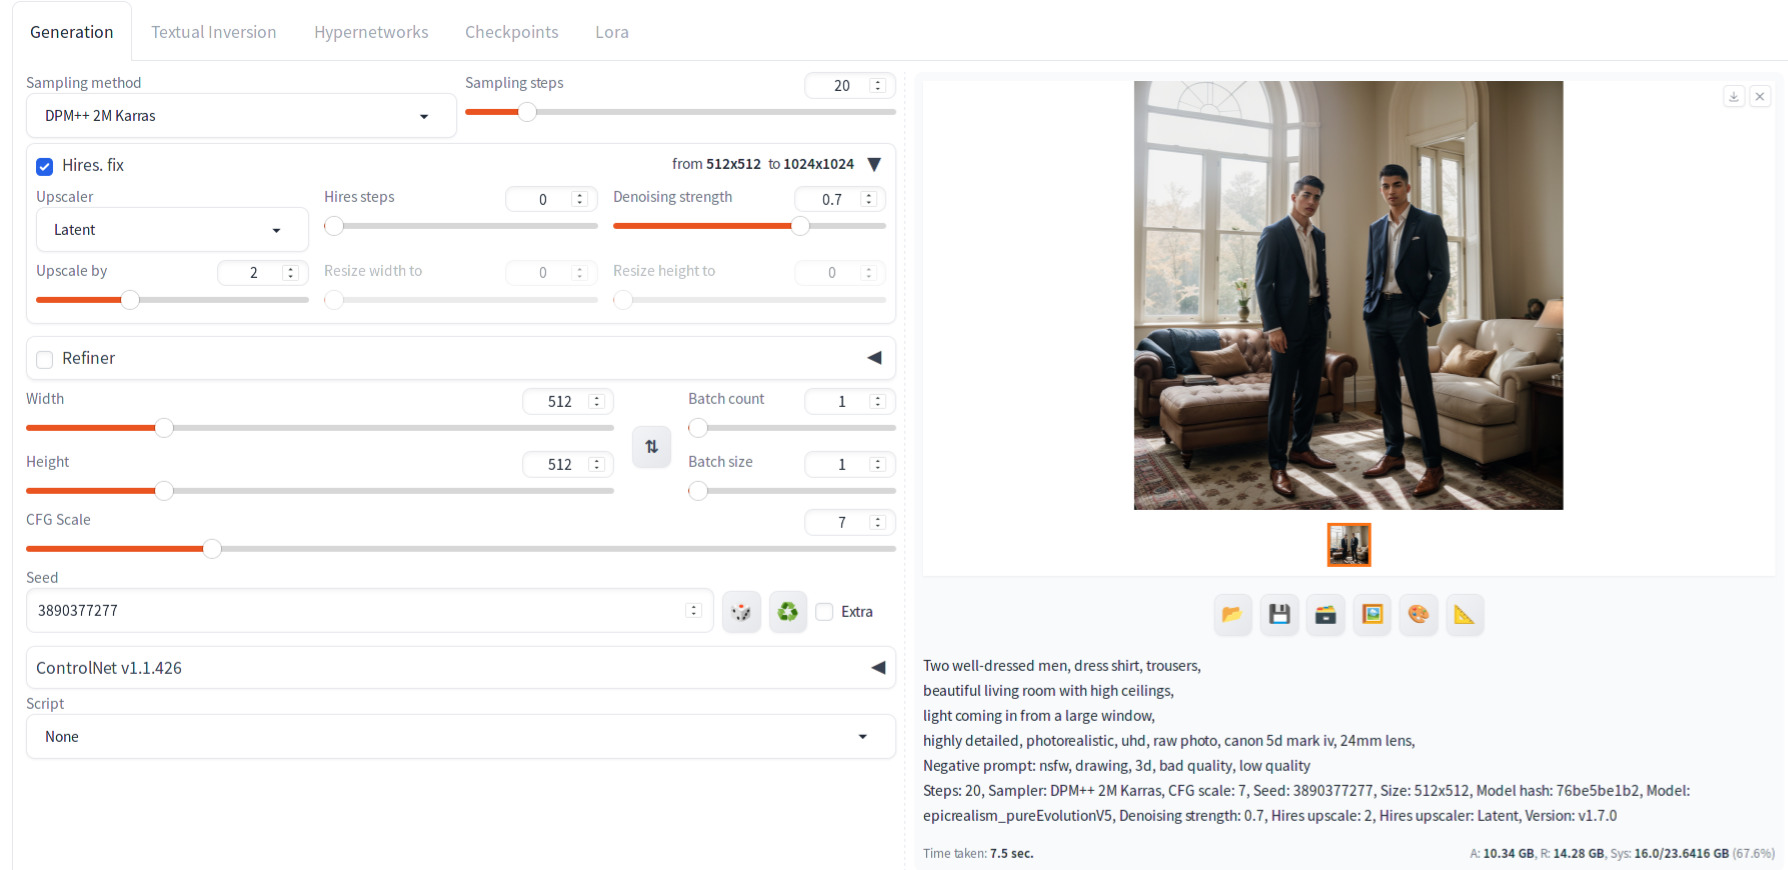
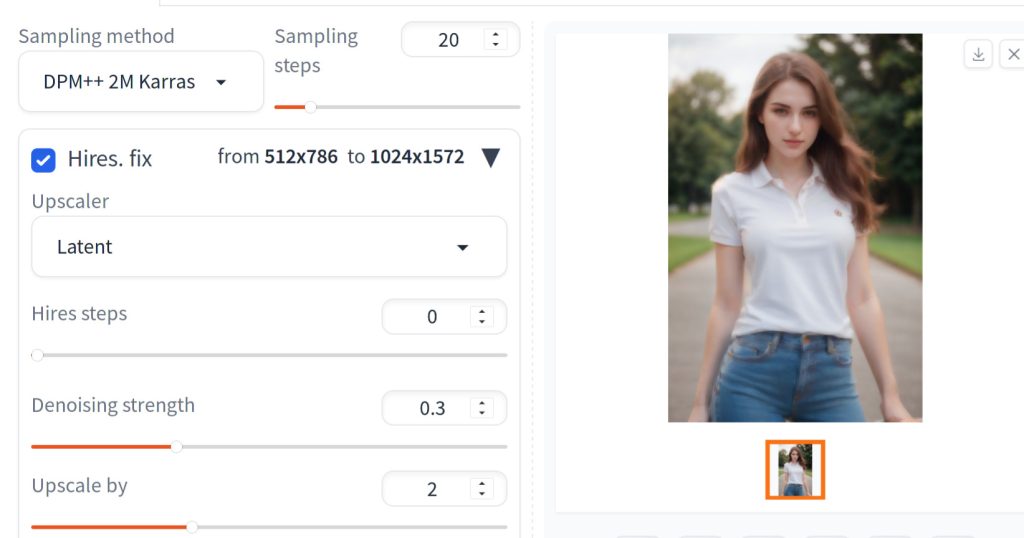
First, on the txt2img tab, Click the Hires. fix check box as shown below.
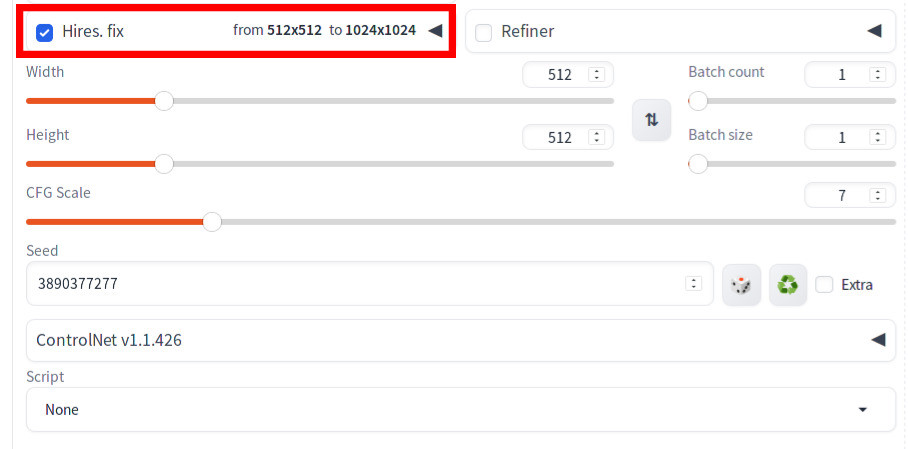
You should see an upscaling resolution information message “from 512x512" to "1024x1024" is now displayed next to the Hires.fix checkbox.
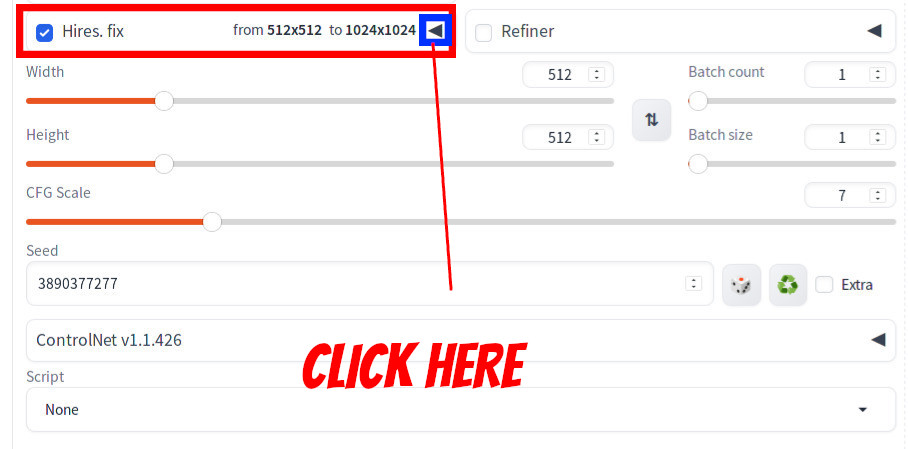
Click the triangle button on the right.
You should see that Hires. fix section is now displayed.
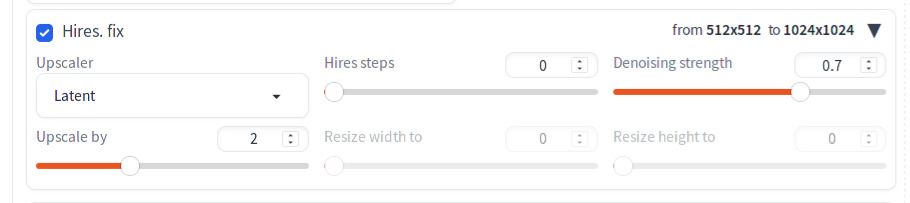
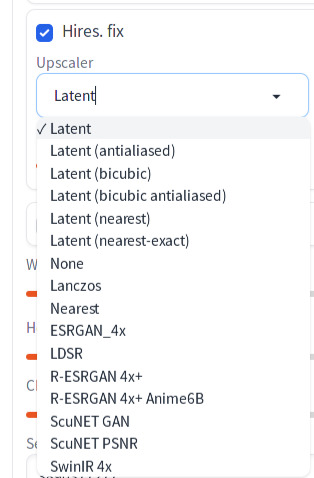
There are many upscaling options to choose from in the Upscaler drop box. For now, let’s stick to “Latent“. The maximum value that you can specify in Upscale by is 4, but let’s use 2 for this tutorial.
If you keep Hires steps as 0, the same number of sampling steps is used [1]. So if you use 20 for the original txt2img generation, second diffusion process will be using 20.
On this dialog, please note that there are two other options that are hidden by default:
- Show hires checkpoint and sampler selection
- Show hires prompt and negative prompt
These options can be enabled in the Hires fix section Settings | User Interface | UI alternatives.
Now you are ready to generate an image. Press Generate. Note that the generation takes longer than not using Hires fix due to upscaling and the second pass through diffusion. After waiting for a while, you should see the following.
Here is the 100% crop.
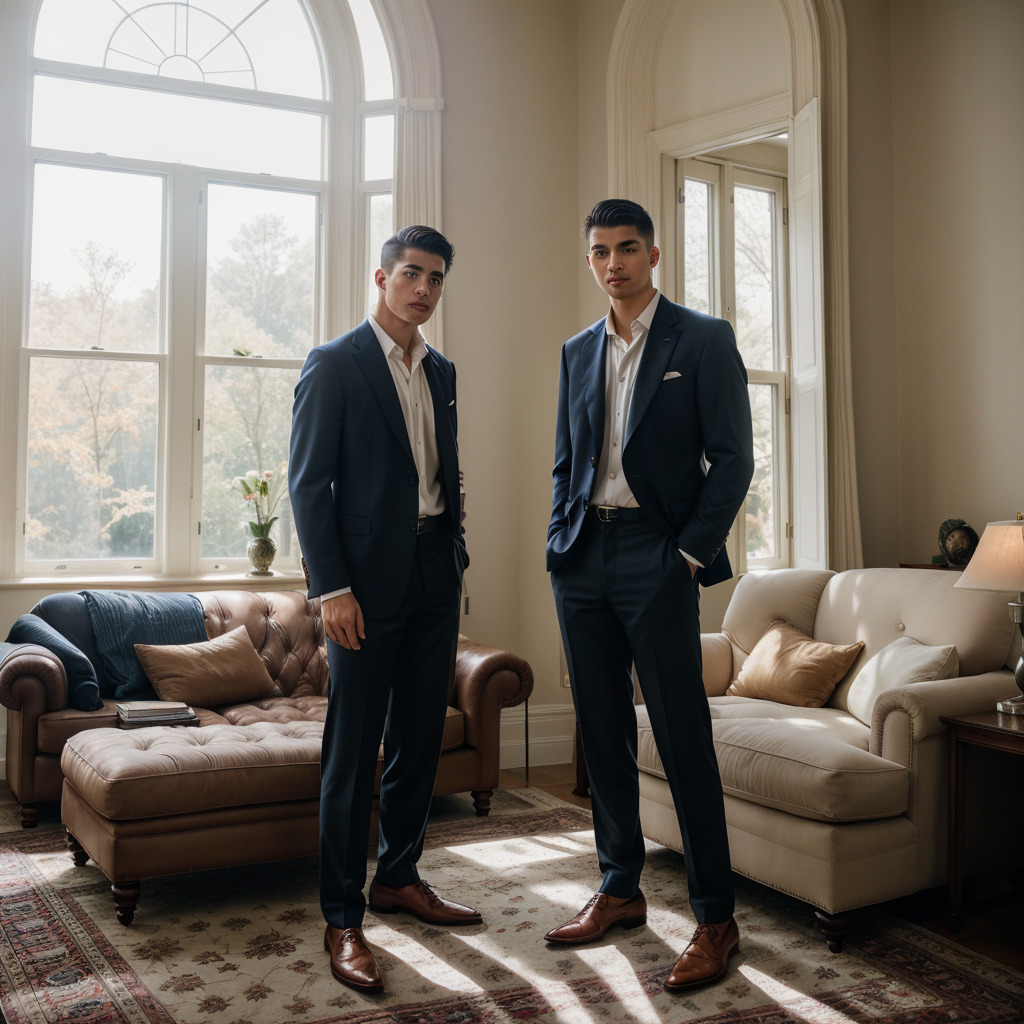
Note that face distortion is now fixed. At this point, you can use face CodeFormer or Inpainting if you want further touch up. Below is the result of using CodeFormer with visiblity=1, weight=0.5.

Parameter tuning for extensive geometry changes
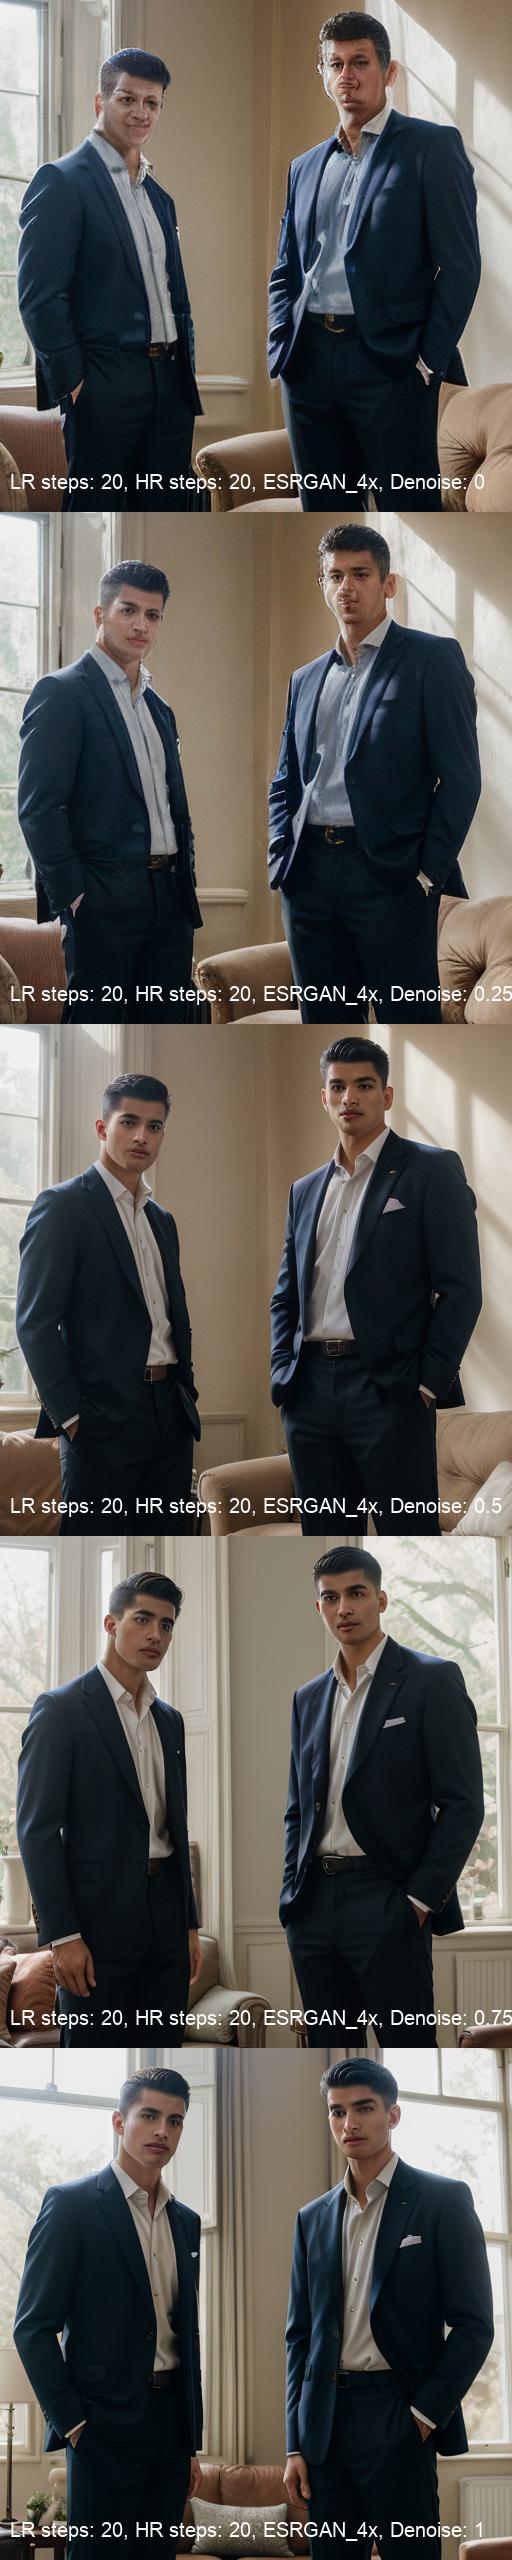
This section goes over the images generated using different upscaling methods and parameters. We will be showing the results for:
- Latent
- ESRGAN_4x
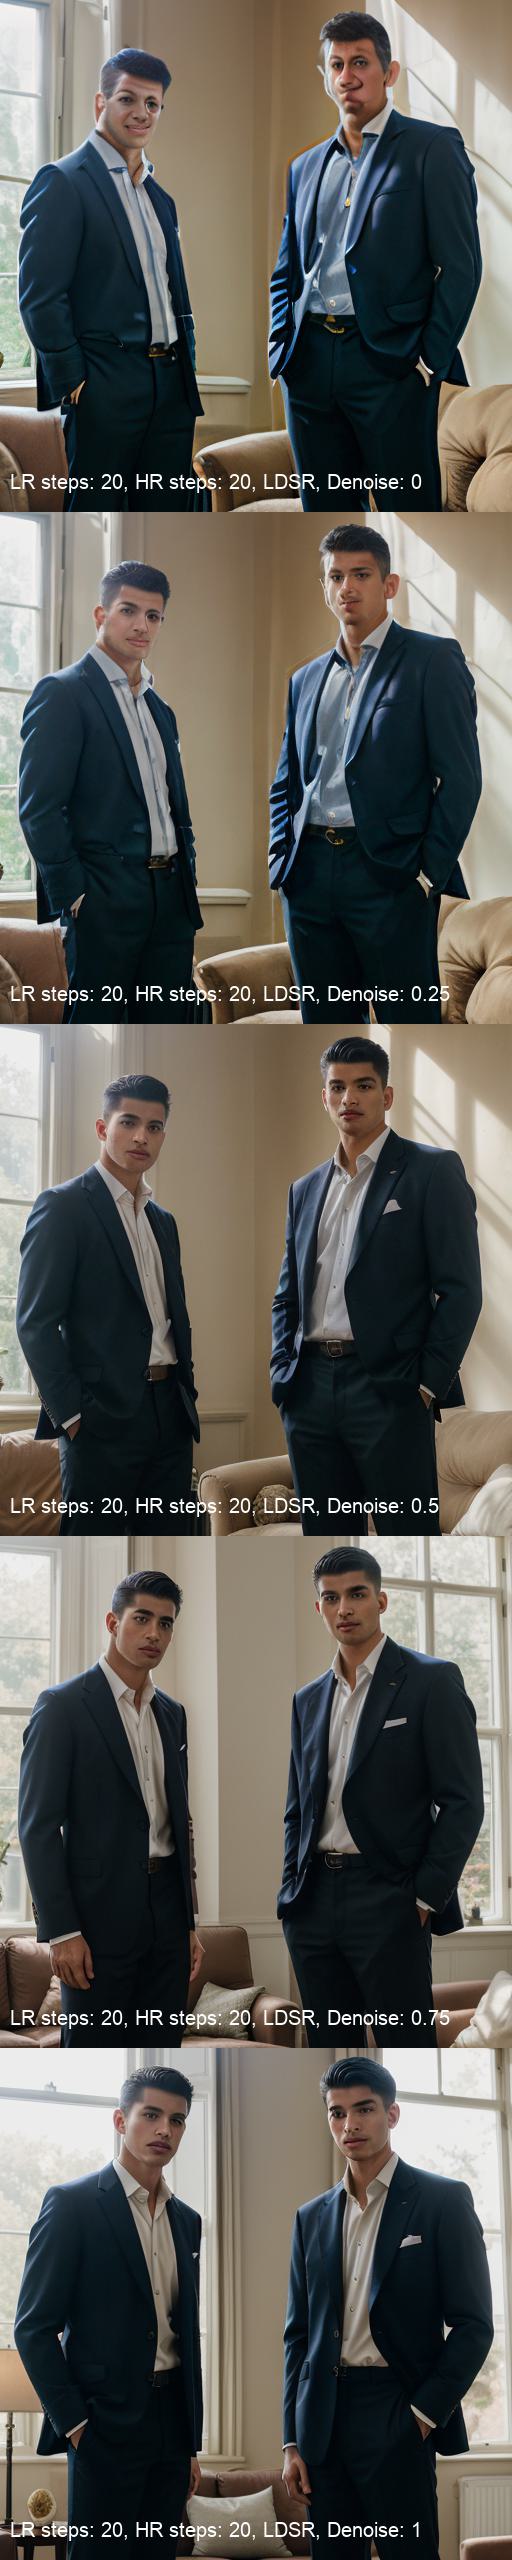
- LDSR
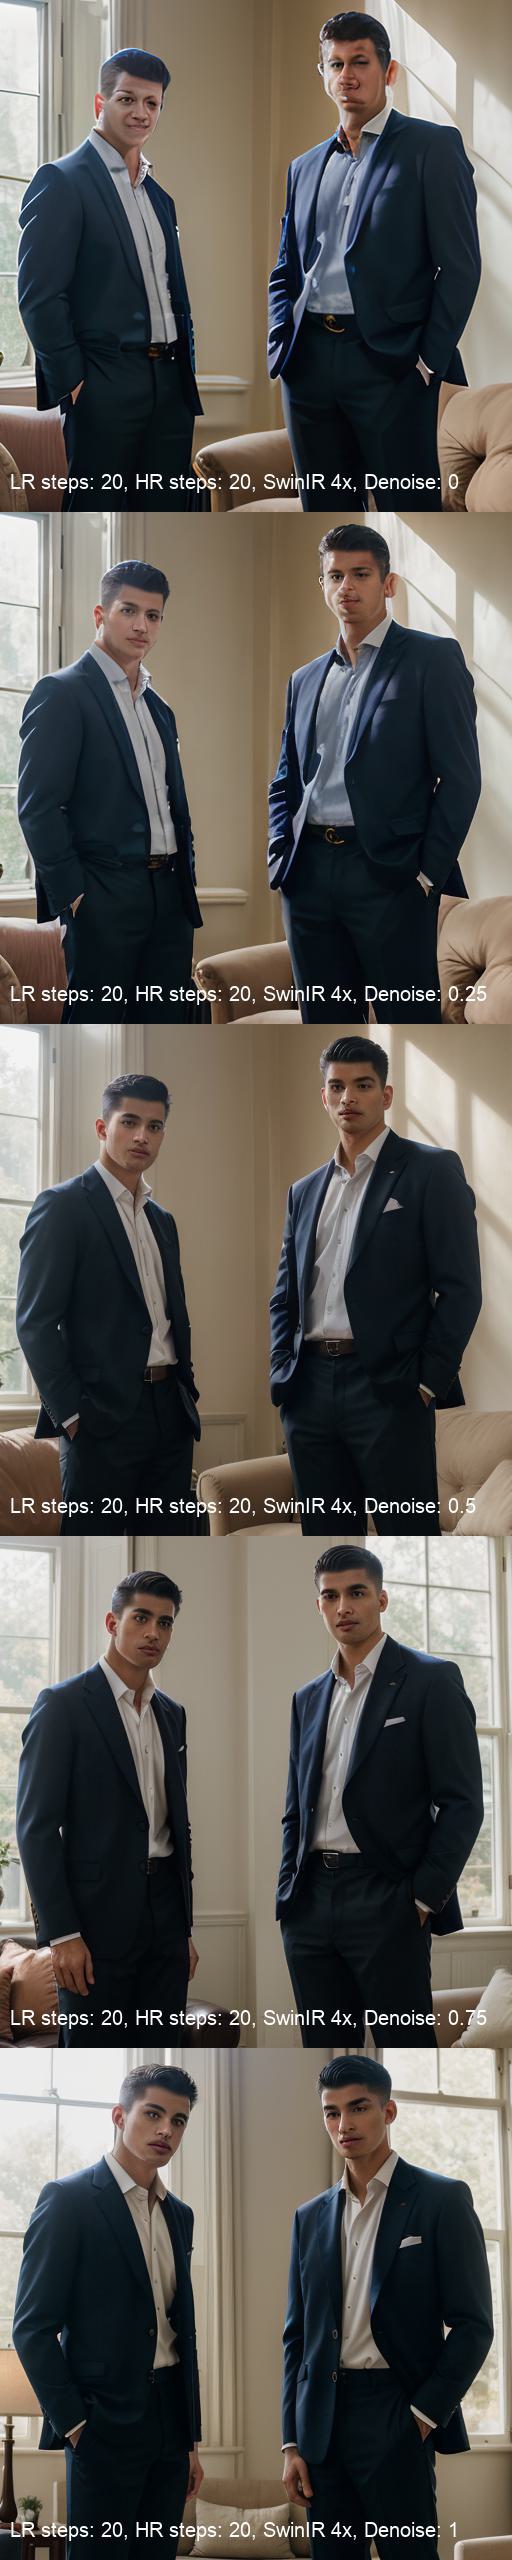
- SwinIR4x
Generation parameters are the same as the parameters for the original image unless noted. Please refer to the appendix.
Latent
ESRGAN_4x
LDSR
SwinIR 4x
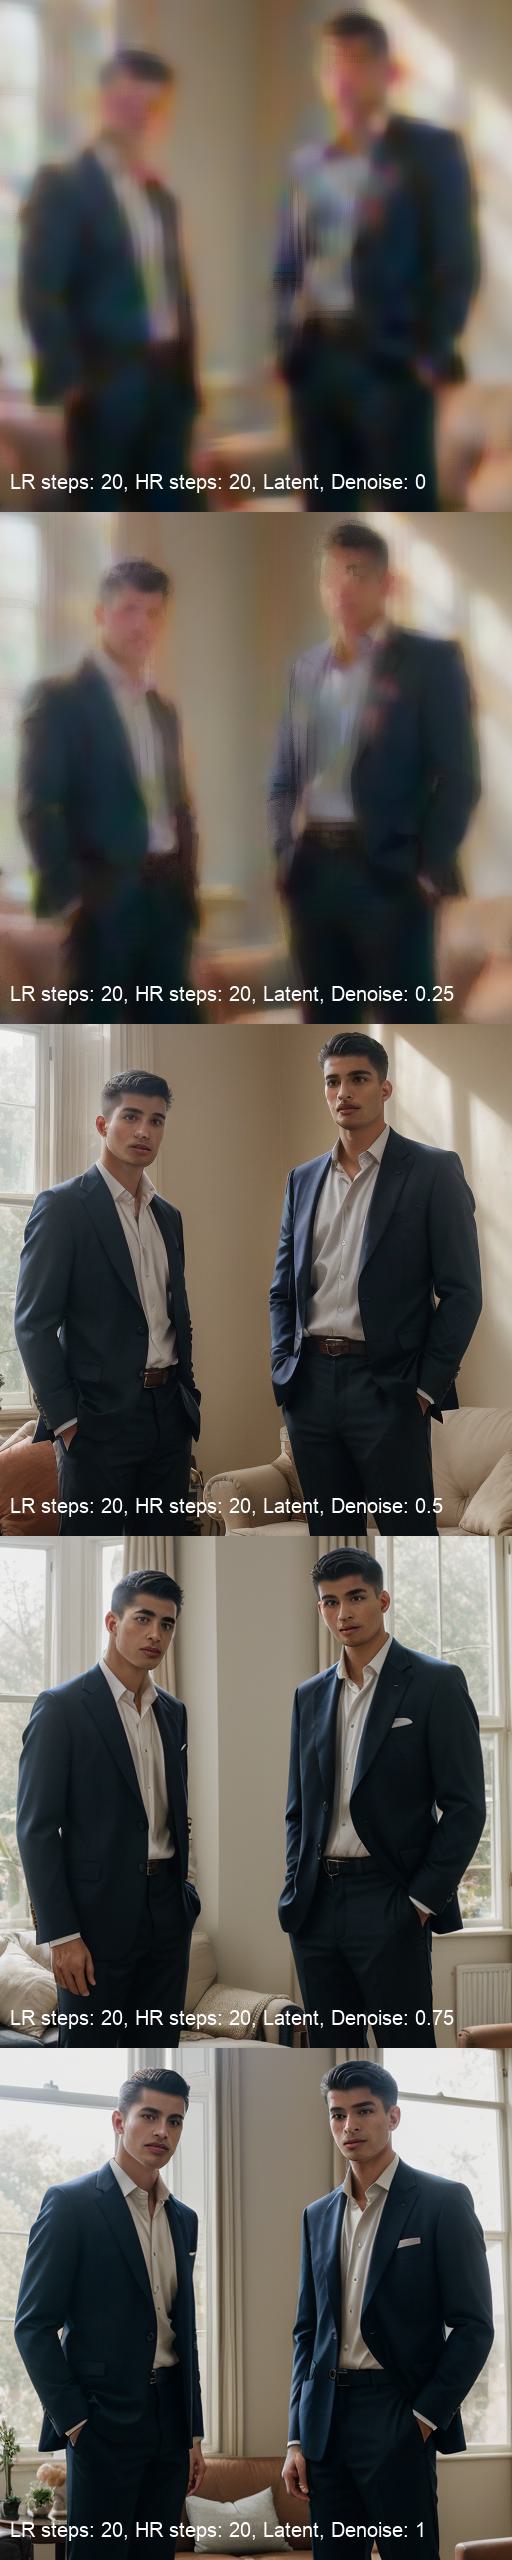
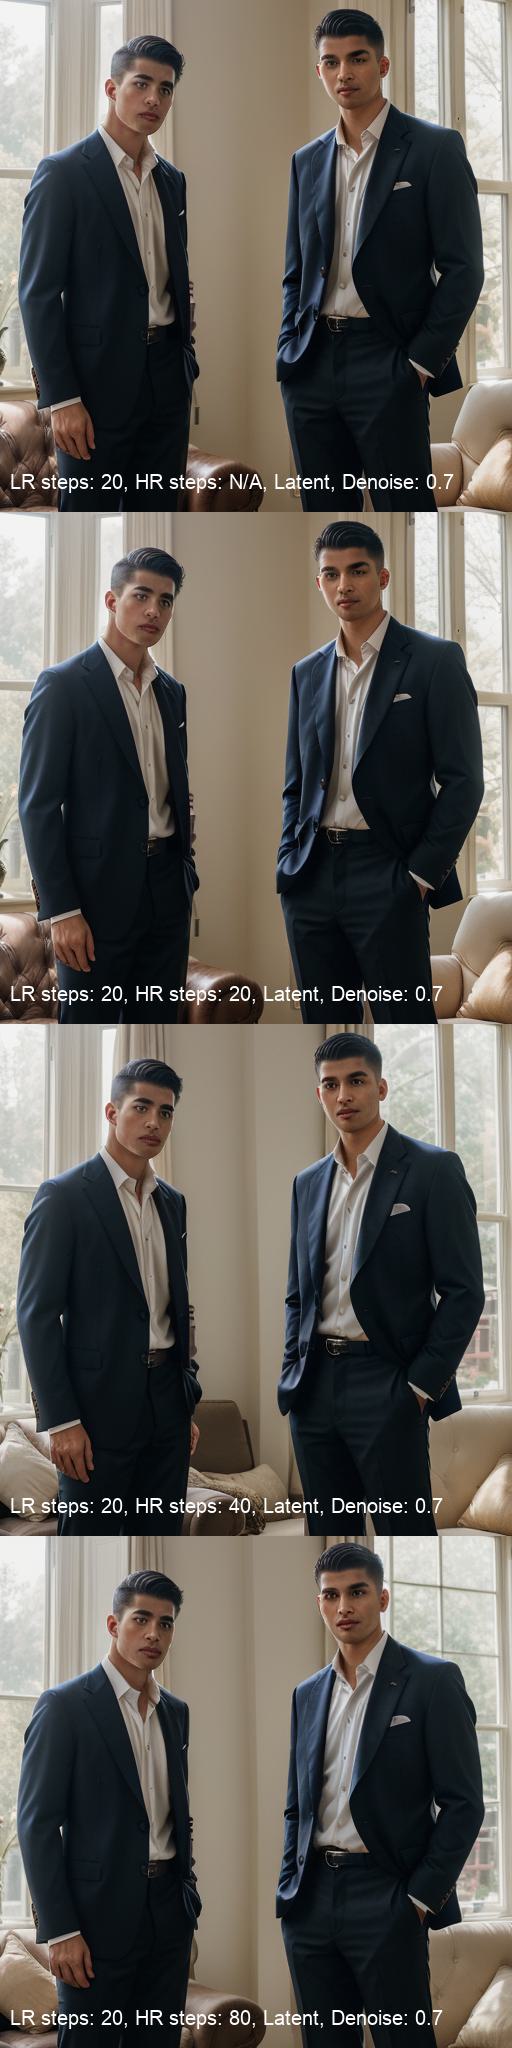
Upscaling set to Latent with varying High res sampling steps
I put N/A in the HR steps for the top image. In the UI, I actually put 0, however as mentioned above Automatic1111 uses the same number of sampling steps as lowres if you put 0, so the actual sampling steps for this image is 20.
Suggested approach for parameter settings that require extensive geometry changes
As shown in the above result, no matter what method you choose, setting denoising strength to a value below 0.5 can fail to generate a satisfactory result: If set to latent, the result is blurry, or if not set to latent, then the face is still distorted. Setting 1 seems to generate an image that can deviate too much from the original image. Therefore you might want to start with 0.7 and tweak from there. In terms of number of sampling steps in high resolution, increasing the hires steps did not show significant improvement in image quality around the face.
Parameter tuning for Touch up
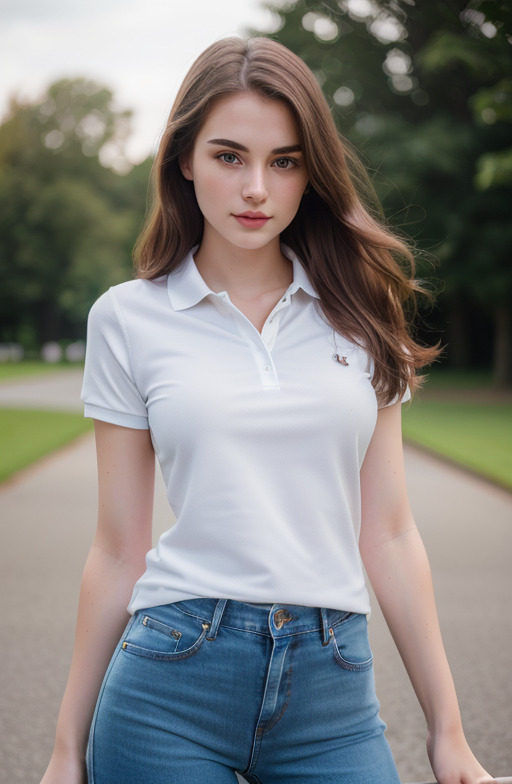
Now we will be going over the second scenario where the goal of the Hires fix is a light touch up without geometry changes. Here is the image that we want to enhance.
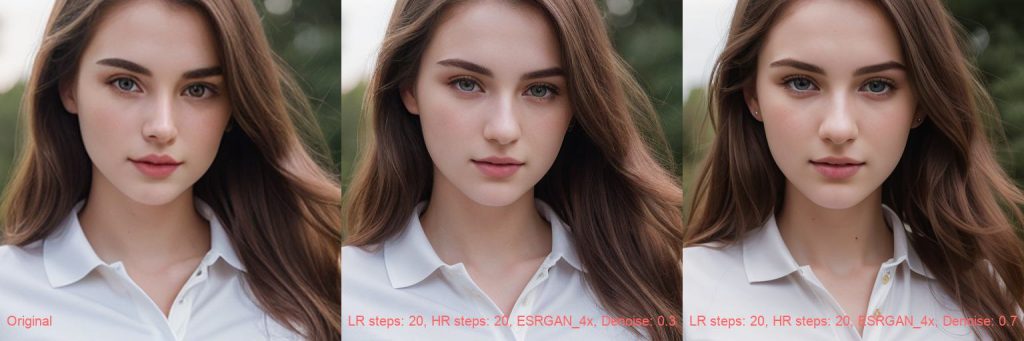
The image below showcases a combination of the original image with two Hires fix variations, all aligned horizontally:
- The face from the original image, upscaled 2x using Pillow’s resize method with Image.ANTIALIAS flag.
- Hires fix version, upscaled 2x by ESRGAN_4x with a denoise setting of 0.3.
- Hires fix version, upscaled 2x by ESRGAN_4x with a denoise setting of 0.7.
In scenarios where the aim is to enhance the image’s appearance without altering its geometry, a high denoise strength like 0.7 might not be ideal, as seen in the examples above and the rightmost photo below. It’s better to start with a lower denoise value and adjust as needed. Furthermore, when aiming for realism, it’s crucial to closely examine the iris and its edges to see how they are affected by the upscaling process and the Hires fix. This careful inspection ensures that the final result aligns with your expectations, particularly in terms of detailed features like the eyes.
In this scenario, using a latent upscaler is not advisable if the denoise strength is set low. As demonstrated in the previous example and the below image, a low denoise setting may result in an image that doesn’t meet quality standards. Therefore, it’s preferable to opt for a non-latent upscaler to achieve better results.
Congratulations! You now have a comprehensive understanding of both the inner workings of the High-Resolution Fix and how to utilize it effectively. While it’s a powerful tool, one notable drawback is the significant time it takes to generate an image. A useful tip to overcome this is to disable the High-Resolution Fix while adjusting the parameters for your image. Once you’ve finalized the parameters, you can then re-enable the High-Resolution Fix and use the same seed for optimal results.
References
[1] Retrieved from https://github.com/AUTOMATIC1111/stable-diffusion-webui/blob/master/modules/processing.py
Appendix
Generation parameters for the bad photo
Two well-dressed men, dress shirt, trousers,
beautiful living room with high ceilings,
light coming in from a large window,
highly detailed, photorealistic, uhd, raw photo, canon 5d mark iv, 24mm lens,
Negative prompt: nsfw, drawing, 3d, bad quality, low quality
Steps: 20, Sampler: DPM++ 2M Karras, CFG scale: 7, Seed: 3890377277, Size: 512x512, Model hash: 76be5be1b2, Model: epicrealism_pureEvolutionV5